Below is an overview of the Livespaces installation steps for a fixed meeting room.
For detailed instructions, see the Software Installation Manual in the Livespaces Wiki.
Major Components Of A Livespace
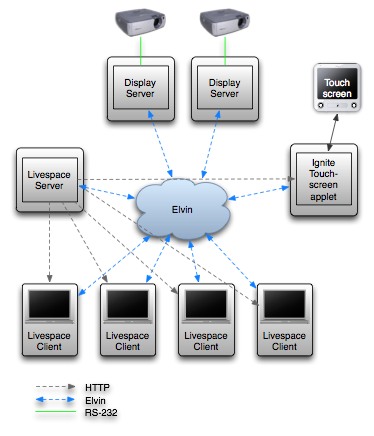
Elvin — event router between components
Livespace server — hosts software bundles, room-wide services
Livespace clients — loads Livespace software from server
Main Server
Serves software bundles, configuration and media
Hosts room-wide services
Room entity, clipboard, TeamThink, meta apps, …
Display Servers (optional)
Provide shared desktops
Default video source for projectors
Either single multi-head host or one host per display
Livespace service may control projectors (via RS-232 or TCP/IP)
Touchscreen Display (optional)
Small machine that runs Ignite in fullscreen mode to drive touchscreen display
Can also use main server for Ignite + desktop switcher instead
Livespace Clients
Laptops or small form factor PC’s
Mac Mini, AOpen Mini, DreamPC, Tablet PC …
May use Wacom tablet displays to add pen capability
Runs Livespace dashboard with client applications
Installation — Overview
The Livespaces software is deployed as a set of software bundles executed in an OSGi runtime environment. Different sets of bundles are typically deployed on different hosts.
Although we distinguish between server and client installations, the only difference between the server and the clients is:
The server holds the bundles and their configurations and delivers them to clients via HTTP. The server itself loads bundles and configuration from the local filesystem via a
file:URL rather thanhttp:.The server runs several singleton Livespace services that are used by nearly all Livespace instances, such the Room service, Information Repository, link sharing, etc.
The process of installing the Livespaces software involves the following steps:
Install an Elvin router, typically Avis, using its default configuration. This Elvin router provides the message bus used by all the Livespace services, and there must be one dedicated Elvin router per room. The router usually runs on the same host as Livespaces server.
Install the Livespaces server software and minimally configure it for the room.
Install the Livespaces client on a workstation and test. Once operational, install on other clients.
Optional: install the Livespaces client on a machine driving the room’s control panel (typically a touchscreen) such that it automatically runs Ignite in full screen mode on startup.
Optional: install the Livespaces client on machine(s) used as shared desktops such that Livepoint may be used to control them from client machines.
Optional: configure other Livespace services such as hardware controllers (projectors, lights, video switches, audio mixers, etc). These services may run on the main server, or on any other machine in the Livespace.
Installation — The Server
The Livespace server software comes in two packages:
A ZIP’ed package that may be expanded then configured. This is primarily intended for Unix-based systems (including Mac OS X), but may also be used with Windows if a Unix environment like Cygwin is available.
A self-installing .EXE for Microsoft Windows. This provides much the same content as the ZIP install, but adds some auto-configuration, and the option to registering Livespace as a system service
Both installation methods require two key configuration properties:
LIVESPACE_OSGI_PATH: this is a URL pointing to the root of the Livespaces server installation. For the server this is afile:URL such asfile:///opt/livespaces-1.2(Unix) orfile:///Program Files/Livespaces Server 1.2(Windows). Clients use ahttp:URL pointing to the server as theirLIVESPACE_OSGI_PATH(see later). Note: if you are using the source distribution as the server,LIVESPACE_OSGI_PATHshould point to thelivespace.osgimodule.LIVESPACE_CONFIG: this is the name of the room’s configuration. Generally you will choose a name for this based on the room name, lowercased, with no spaces (e.g. forDSTO Intense Labyou might usedsto_intense_labas the configuration name.
Windows Installer Details
The Windows installer will ask for LIVESPACE_CONFIG (the “Livespace
configuration” field in the GUI), it will generate
LIVESPACE_OSGI_PATH from the installation directory.
There are several command line options for the Windows installer that will allow you to automate the installation process: see the Software Installation Manual in the wiki for details.
ZIP Installer Details
To configure the LIVESPACE_OSGI_PATH and LIVESPACE_CONFIG after
installation of the ZIP, you simply set the environment variables of
the same name:
  $ export LIVESPACE_HOME="/opt/livespaces-1.2"
  $ export LIVESPACE_OSGI_PATH="file:$LIVESPACE_HOME"
  $ export LIVESPACE_CONFIG="room_config"
Minimal Server Configuration
If you used the Windows installer, the minimal configuration described here will be done for you, however you’ll want to come back to this section later to find out how to further customise it.
The Livespaces server configuration files are in
$LIVESPACE_HOME/config, the general layout being (with some files
and directories elided for clarity):
  $LIVESPACE_HOME
    config/
      default/
        deploy/...
        services/...

      install_template/
        deploy/
          hosts.category_map
          services.deploy_map
          client.deploy
        services/
          globals.properties
There are also README files in each directory which will provide
further assistance if needed.
To minimally configure the server:
- Copy the supplied configuration template:
  $ cd $LIVESPACE_HOME/livespace.osgi/config
  $ cp -r install_template room_config
- Edit
room_config/services/globals.propertiesto set room name and server host name. After configuration it should look something like:
  # The name of the room
  room_name=My Meeting Space

  # The room's short name: set this to be the full name for now
  room_name_short=My Meeting Space

  # The Livespace server's hostname ($HOSTNAME minus the domain)
  main_server=server-hostname
Allocate hosts to functional categories. Each host in a Livespace is assigned a category which is used to control what bundles it runs and their configuration. Standard categories are server, client and display, but you can create your own categories as needed. Configuration can also be customised on a per-host basis.
Edit
deploy/hosts.category_mapso that it looks something like:
  # Maps the host named "server-hostname" to the "server"
  # category.
  host.server-hostname=server

  # Maps the host named "client1-hostname" to the "client"
  # category.  if you have a client host in mind to test
  # with, map it here, otherwise you could leave this
  # until later
  host.client1-hostname=client
Running The Server
Windows
If you installed Livespaces as a system service, it will already be
running, otherwise you can start it as a service with
bin\start_livespace_service.cmd or run it on the console with
bin\start_livespace.cmd. The latter mode is recommended while
setting up, since it makes it easier to see how things are going.
When running as a service you can monitor the Livespaces output by
viewing the logs\livespace.log.
Unix And Other Platforms
To start Livespaces from the command line:
  $ export LIVESPACE_HOME="/opt/livespaces-1.2"
  $ export LIVESPACE_OSGI_PATH="file:$LIVESPACE_HOME"
  $ export LIVESPACE_CONFIG="room_config"
  $ cd $LIVESPACE_HOME
  $ ./bin/start_livespace
If you want to install Livespaces as a system service, the
start_livespace script has several options to facilitate that,
including the -pidfile and -daemon options. See the source of the
script for details.
Checking The Server Is Running
The server, by default, runs the client bundles as well as the server-specific ones, which means the Dashboard GUI should be visible when running: on Windows this appears as an icon in the taskbar notification area, on Mac OS X and Linux, the icon will appear in the system menu.
Another way to verify the server is running and ready to serve clients
is to connect a browser to its HTTP service:
http://server_host:8090/livespaces/config and
http://server_host:8090/livespaces/logs.
You can also run the Service Browser and OSGI Administration applications from the Admin sub-menu: these are valuable tools to see what services and bundles are deployed.
Installing Clients
The Livespaces client is simply a tiny Java shell that pulls the Livespaces OSGi bundles from the server: no significant software is directly installed on the client. For this reason you should rarely, if ever, need to upgrade clients after the initial install.
You can install the client either as a ZIP or, on Windows, using the
auto installer. In either case, the client installer needs URL to
server and config name. The server URL generally looks like
http://server-hostname:8090/livespaces, and is the same value you
would use as the LIVESPACE_OSGI_PATH on the command line.
TIP 1: to test the client on the same host as the server, you can run
start_livespace with the “-h virtual-hostname” option, which will
make the client appear to be running on host called
virtual-hostname.
TIP 2: To quickly install on multiple clients, you can:
On Unix or Windows: make a customised ZIP install with the
LIVESPACE_OSGI_PATHandLIVESPACE_CONFIGvariables pre-set in the script, or,On Windows, create a shortcut to run client in silent auto-install mode with the
/SERVER_URLand/CONFIGparameters
The Livespaces Configuration System — Basics
The key idea behind the Livespaces configuration system is that configuration is specified in a series of Java properties files. Configuration includes:
Which categories a host is in (
hosts.category_map),Which bundles are delivered to each category (or specific host) (the
service.deploy_mapand*.deployfiles) and,Configuration settings for the bundles (the
*.propertiesfiles in theservicesdirectory).
The properties files are split into two tiers: default and local, the local tier being local settings for your room, and the default tier being provided by the Livespace development team. At deploy-time the default and local tiers are logically merged, with the local tier’s settings taking precedence over any existing ones in the defaults.
The diagram below illustrates the arrangement of property files, and the effect of merging them:

deploy/hosts.category_map: This exists in both defaults and local, since the local server hostname will have been mapped to the server category here.deploy/service.deploy_map: There is no local cusomisation, so the default mappings from category/host to deploy sets will be used.deploy/server.deployanddeploy/client.deploy: The server deploy set has ben extended locally. Note that the default server deploy set is not included automatically, but can be by using theinclude default/serverdirective inserver.deploy.services/livespace.http*.properties: These files configure thelivespace.httpservice. The files ending in-serverand-clientapply only to hosts in the server or client category: on those hosts they are merged with the base HTTP property set. In the example, only the client set is applied.services/livespace.livepoint.properties: A specialised property set forhost1has been added locally: it will be applied on top of the defaults.
The concepts behind the Livespaces configuration are explained in more detail in the Software Installation Manual.